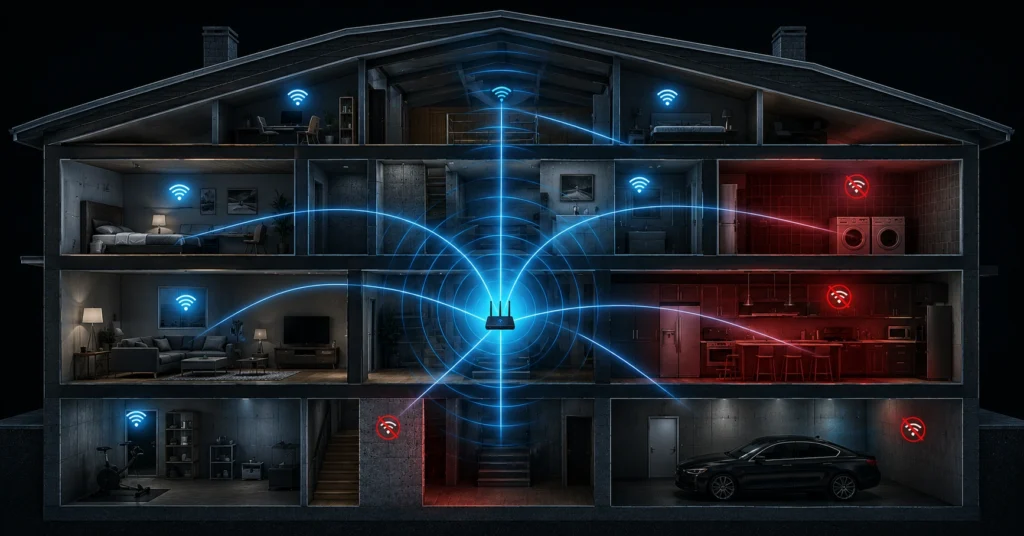
Before you spend $400 on a multi-node mesh kit or an aggressive gaming router, you need to identify where your current topology is bleeding throughput. A large property introduces distinct structural bottlenecks that cannot be solved by brute force broadcast power alone.
| Symptom | Probable Cause | Immediate Diagnostic Test | Zero-Dollar Target Action |
| Full bars on device, but websites stall or fail to load. | Asymmetrical connection; device can hear router, but router cannot hear device. | Run a ping test from the dead zone; look for packet loss over 5%. | Relocate router away from floor level and structural concrete layers. |
| Speed drops by 80% when moving one room over. | High-frequency 5 GHz attenuation from solid brick, plaster, or thick mirrors. | Force device onto 2.4 GHz band and re-test speed at the same spot. | Change router placement to establish a clear line-of-sight to the doorway. |
| Drops occur exactly when the microwave or baby monitor runs. | Co-channel 2.4 GHz interference from household electronics. | Check router logs for channel changes or monitor drop times manually. | Log into router dashboard and lock 2.4 GHz onto channels 1, 6, or 11. |
| Network vanishes entirely on upper floors or wings. | Distance limit reached or floor joist foil insulation acting as a shield. | Install a Wi-Fi analyzer app to measure signal drop in dBm across floors. | Shift router to an open, central hallway or deploy an access point. |
What This Setup Rewards—And What It Punishes if You Set It up Wrong
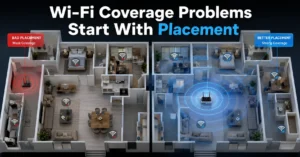
Large-scale home networking rewards deliberate hardware placement and clear line-of-sight paths. If you place your main gateway next to the incoming fiber terminal or cable drop in a subterranean basement, you are asking high-frequency radio waves to fight through steel beams, thick joists, and heavy utility pipes.
The network rewards a centrally located access point mounted at head height or higher, where waves can propagate downward and outward without skimming structural obstacles.
This environment aggressively punishes the installation of unmanaged hardware chains. Buying three different brands of extenders and scattering them across your rooms will ruin your roaming capabilities.
Your phone will stubbornly cling to a degraded 1 bar signal from the living room router while you are standing directly next to a bedroom extender. This behavior occurs because cheap hardware lacks the internal intelligence to kick a sticky client off its radio when a cleaner node becomes accessible.
What to Know Before You Start
You must understand the distinct behavior of the radio bands inside your equipment before attempting any wireless fix. The 2.4 GHz band is slow, capping out at practical speeds between 50 Mbps and 100 Mbps under real conditions, but it cuts through drywall and solid doors with ease.
The 5 GHz band easily handles gigabit speeds, but it loses substantial energy every time it hits a solid barrier. The newer 6 GHz band found in Wi-Fi 6E and Wi-Fi 7 hardware degrades even faster, requiring almost direct line-of-sight to hold peak performance.
[2.4 GHz Band] ─── High Penetration ─── Low Throughput (50-100 Mbps) ─── High Range
[5.0 GHz Band] ─── Medium Penetration ─── High Throughput (Up to 1 Gbps) ─── Medium Range
[6.0 GHz Band] ─── Low Penetration ─── Ultra Throughput (Multi-Gbps) ─── Short Range
Your construction materials dictate your signal limits more than your actual square footage. Standard internal drywall causes minimal signal loss, usually dropping performance by about 3 dBm to 4 dBm per wall.
Solid red brick, thick plaster with wire lath, and heavy concrete walls can easily cut your signal strength by 15 dBm to 20 dBm per layer. This drops your throughput to near zero, making any attempt to improve wifi signal from three rooms away mechanically impossible without adding a secondary broadcast node.
The Parts Worth Building Around—Named and Specific
If your home spans more than 2,500 square feet, do not try to make a standalone consumer gateway handle the entire footprint. You need a dedicated system built around discrete components. Look at standalone wireless access points like the Ubiquiti UniFi U6 Pro or the TP-Link Omada EAP670.
These units mount flat against ceilings or high walls, casting an unobstructed downward signal cone that covers large areas far better than a box hidden deep inside an entertainment console.
For homes where running structural Ethernet cables is out of the question, use a dedicated tri-band mesh system like the Asus ZenWiFi Pro ET12 or the Netgear Orbi 970 series. The critical detail here is the term tri-band.
These units reserve an entire, isolated high-frequency wireless band exclusively for communication between the nodes themselves—known as wireless backhaul. This layout ensures your client data does not compete with the inter-node link, preserving your internet speeds across the entire property.
Where It Fits: Plans, Tiers, and Real Prices
Buying the absolute top-tier gear is a waste of money if your incoming internet speed cannot saturate it. Match your home coverage upgrade hardware budget directly to the speed tier you pay your internet service provider (ISP) for each month.
- Under 300 Mbps ISP Plan: Do not buy Wi-Fi 7 gear. A dual-band Wi-Fi 6 mesh kit like the TP-Link Deco X55 (3-pack) costs around $180–$200 and handles this speed easily.
- 500 Mbps to 1 Gbps ISP Plan: This requires a dedicated tri-band Wi-Fi 6E or Wi-Fi 7 system to maintain speeds on distant nodes. Budget roughly $400–$600 for hardware like the eero Pro 6E or Asus ZenWiFi ET8.
- Over 1 Gbps Multi-Gigabit Plan: You need multi-gigabit Ethernet ports (2.5 GbE or 10 GbE) on every single node. Systems like the Netgear Orbi 970 or a fully wired Ubiquiti deployment will cross the $900 to $1,500 threshold quickly.
How to Set Up Your Network for Maximum Reach
A successful network deployment relies on systematic execution rather than guesswork. Follow this step sequence to maximize your home coverage footprint safely. (Back up before you switch anything)
Step 1: Document Your Existing Local IP Configuration
Log into your current ISP-provided gateway dashboard using its local IP address—typically 192.168.1.1 or 192.168.0.1. Note down your current LAN subnet mask, DHCP reservation pools, and any custom port forwarding rules you previously configured for local storage or security cameras.
Step 2: Disable the Built-In ISP Wireless Radios
Locate the wireless settings menu inside your ISP gateway and toggle both the 2.4 GHz and 5 GHz radios to “Off.” Leaving these active while setting up a new system creates immediate co-channel interference, degrading the performance of your new equipment before you even configure it.
Step 3: Put the ISP Gateway Into Bridge Mode
Find the system settings menu and change the device operating mode from “Router” to “Bridge Mode” or “IP Passthrough.” This step strips away the routing duties from the ISP box, handing external IP management over to your new hardware and preventing a double-NAT conflict that breaks online gaming and VPN connections.
Step 4: Position Your Primary Base Node Centrally
Connect the WAN port of your new primary router to the top LAN port on your ISP gateway using a verified Category 6 (Cat6) shield cable. Place this primary node on an open shelf at least four feet off the ground, away from surrounding metal file cabinets, large televisions, or concrete support structures.
Step 5: Place Your Satellite Nodes Using a 30-Foot Radius Limit
Locate your secondary mesh nodes or access points no more than two walls or 30 horizontal feet away from the primary base station. Ensure they sit close enough to receive a strong native signal from the core unit so they can cleanly repeat it down the line.
Step 6: Verify Signal Strength with a dBm Assessment Metric
Walk your property with a laptop running an analysis utility like NetSpot or Insider. Ensure your signal level remains above -65 dBm across your critical living areas; anything dropping past -70 dBm will cause intermittent drops, packet timeouts, and buffering flags.
What It Actually Costs: Three Tiers
To build a proper home wireless fix, analyze these three standardized equipment deployment tiers. (2025–2026 rates — verify before purchase)
Budget Tier: $0 to $70
This approach prioritizes using your existing hardware efficiently without purchasing new gear. By spending an hour repositioning your current router out of its closet, running a free analysis app to select non-overlapping channels, and setting up manual 2.4/5 GHz band splits, you can often fix basic dead zones for zero cash. If a short wire run is needed, a 50-foot Cat6 patch cable costs under $20.
Mid-Range Tier: $200 to $450
This tier involves deploying a consumer-grade tri-band mesh network system containing a base station and two wireless satellites. It provides a comprehensive solution for homes up to 4,500 square feet without cutting structural walls to run networking cable. Devices are managed automatically through a smartphone interface, handling roaming handoffs reliably.
Worth-the-Splurge Tier: $800+
This is a prosumer deployment built around a multi-node managed ecosystem like Ubiquiti UniFi or TP-Link Omada. It requires mounting hardwired access points to your ceilings, powered by a Power over Ethernet (PoE) switch located in a central closet.
It delivers uncompromised gigabit speeds across massive estates because every single node connects directly to the core network via physical wire, completely bypassing wireless loss.
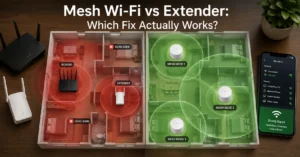
What to Use Instead of the Obvious Choice
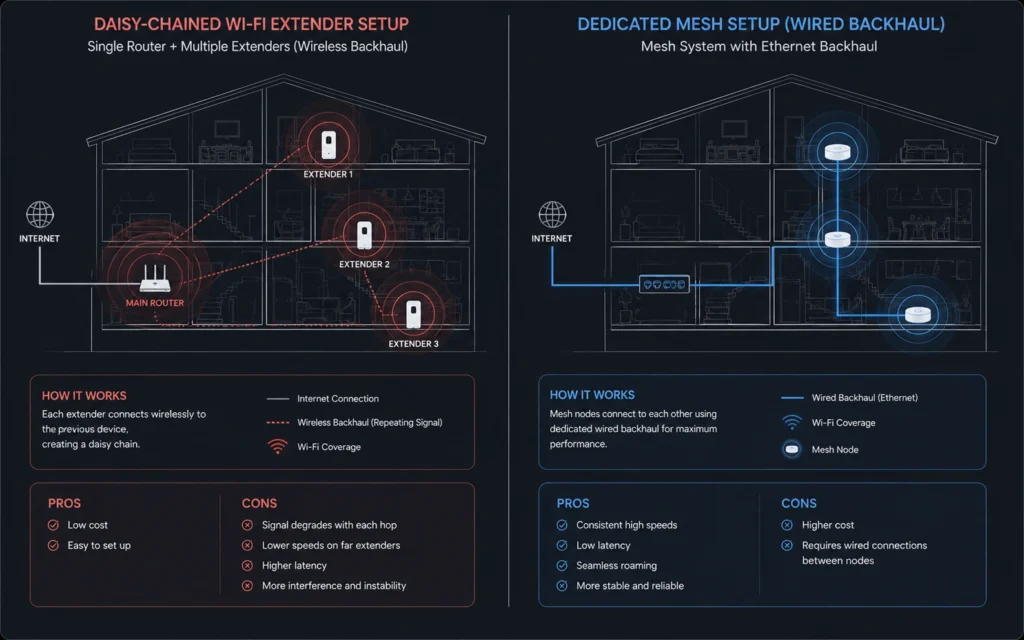
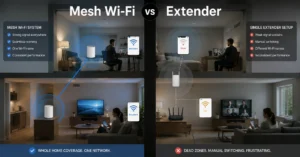
The most obvious response to a dead spot is buying a cheap, wall-plug Wi-Fi extender from an online retail list. Avoid this trap entirely. Extenders listen to your router over the air and then re-broadcast that received signal under a different network name. Because their single wireless radio cannot talk and listen at the same identical millisecond, they cut your available throughput exactly in half right out of the box.
[Traditional Extender Setup]
Main Router ─── (Wireless Link - 50% Speed Loss) ─── Wall Extender ─── Client Device

[Dedicated Mesh / Wired AP Setup]
Main Router ─── (Dedicated Backhaul / Cat6 Cable) ─── Mesh Node / AP ─── Client Device
Instead of a cheap wireless fix extender, try these alternate paths first:
- Move Your Existing Router: Shifting your gateway out of an enclosed utility room into a central hallway costs nothing and regularly solves coverage issues across large homes.
- MoCA Adapters: If your home has existing coaxial cable ports for cable TV in different rooms, use a pair of MoCA 2.5 adapters like the ScreenBeam ECB7250. These turn your coax lines into an instantaneous 2.5 Gbps physical Ethernet backhaul, allowing you to attach a clean access point exactly where the signal drops.
- Powerline Adapters: For older homes lacking coax, use powerline adapters like the TP-Link AV2000. These route data across your home’s existing electrical copper wiring, though their real-world stability depends heavily on the layout of your breaker box.
Frequently Asked Questions About Home Wi-Fi Upgrades
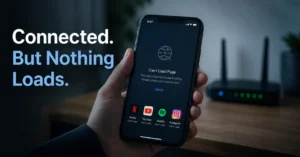
Why does my Wi-Fi show full bars but won’t load pages in the master bedroom?
Full bars only indicate that your device can hear the loud transmission from the router. It does not mean your device’s weaker internal antenna can broadcast its reply back across the home. High latency and packet loss occur when this return path is blocked by brick walls, mirrors, or structural metal.
Will buying a 10-antenna gaming router fix dead zones on my second floor?
No, a single high-power router rarely fixes dead zones across multiple floors. Government regulations limit maximum broadcast power on consumer hardware, regardless of antenna count. Moving the router to a central, elevated location or installing a hardwired wireless access point is far more effective than buying expensive hardware.
Is a mesh Wi-Fi system better than a cheap Wi-Fi extender for coverage?
Mesh systems are vastly superior because they create a unified network under one name and handle handoffs between nodes cleanly. Extenders create separate, secondary networks that force your device to stay connected to a weak signal instead of switching. Extenders also cut your available wireless throughput in half over the air.
Continue Exploring
- Tech Troubleshooting, How-To Review our central troubleshooting repository to learn how to resolve complex software drops, device platform disconnects, and home network configuration errors step-by-step.