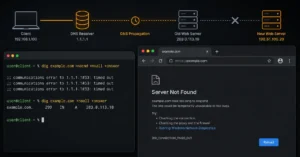
The dangerous part of changing hosting is not the hosting. It’s the DNS cutover.
Most beginners think the move is finished when the files are uploaded to the new server. Then the nameserver change happens, email stops arriving, SSL fails, and half the visitors still reach the old site because their ISP cached the previous DNS response six hours earlier. That’s usually where the support tickets start.
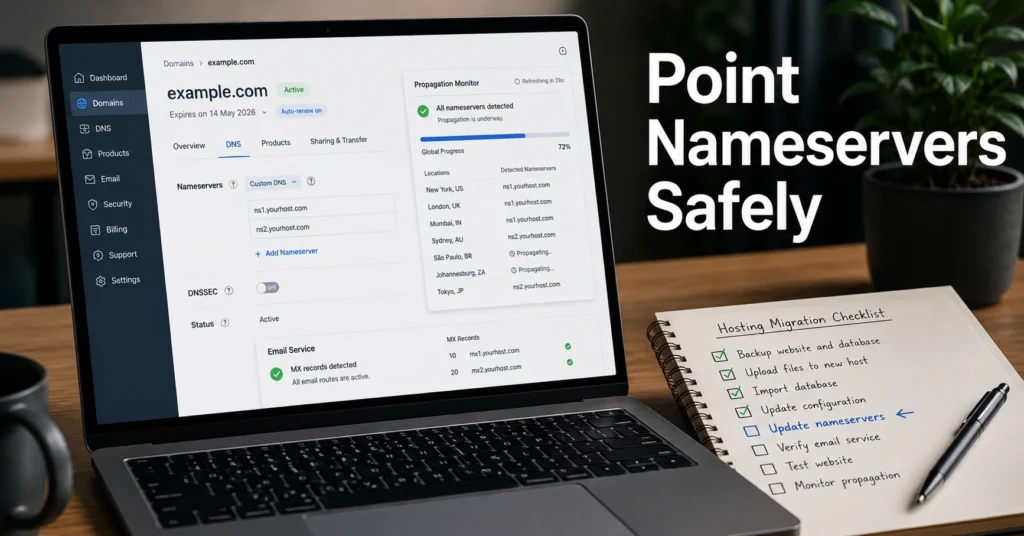
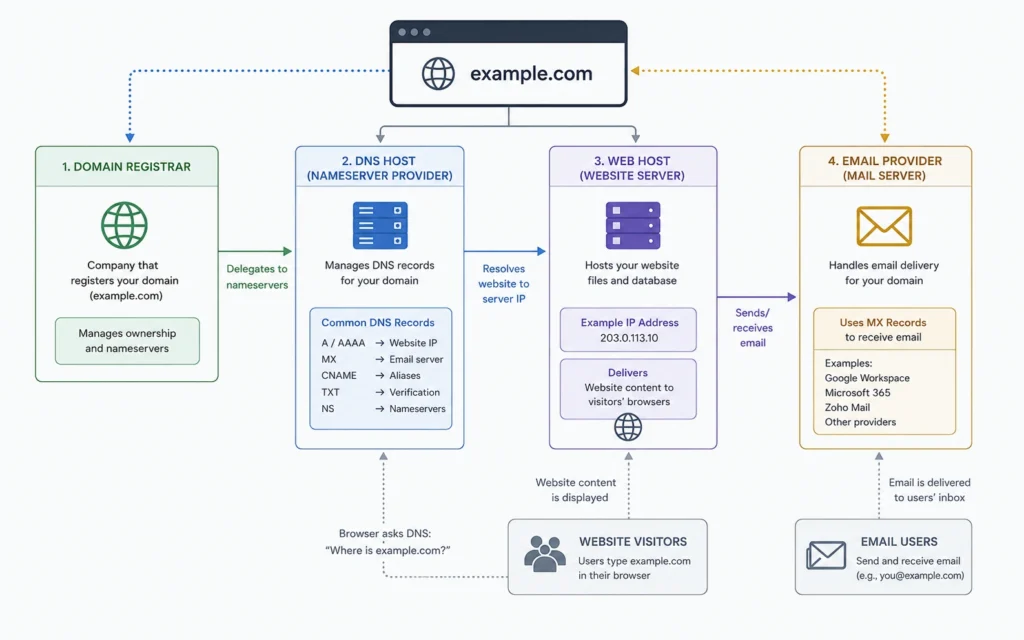
Pointing nameservers safely means treating the move as a sequence, not a button click. The order matters. Domain registrar, DNS host, web hosting, and email hosting are separate layers — and confusing them is how sites disappear for a day. One missed MX record can break invoices, contact forms, and password resets at the same time.
This walkthrough uses the safer sequencing method most hosting “one-click migrations” skip.
Changing nameservers safely starts before the DNS change
Here’s the direct answer.
Do not change nameservers first. Build the new hosting environment completely before touching DNS. That means the new site should already load correctly, SSL should already be installed, and email DNS records should already exist before the nameserver cutover begins.
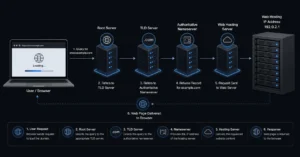
A nameserver tells the internet which DNS provider controls your domain records. Once you change nameservers, every DNS record changes with it unless the new provider already contains matching entries.
That includes:
- A records (website IP address)
- MX records (mail routing)
- SPF records (email sender validation)
- DKIM records (signed email authentication)
- DMARC records (anti-spoofing policy)
- Subdomains
- Verification records
Nameserver mistakes can take a site offline. Worse, they often break email quietly.
What you need before you point nameservers
| Requirement | Why It Matters | Typical Failure If Missing |
|---|---|---|
| Full website backup | Rollback safety | Site cannot recover after failed migration |
| New hosting account active | DNS must point somewhere working | Blank site or server error |
| Existing DNS records exported | Prevents missing records | Email failure or broken services |
| SSL certificate installed | HTTPS continuity | Browser security warnings |
| Access to registrar account | Required for nameserver changes | Migration blocked |
| Lowered TTL value | Faster propagation | Long DNS inconsistency |
TTL means “Time To Live.” It controls how long DNS resolvers cache a record before checking again. A common default is 14,400 seconds (4 hours). Lowering it to 300 seconds before migration reduces propagation delay during the cutover window.
And this is the part most beginners miss: your registrar is not always your DNS host.
You may have:
- domain registration at Namecheap
- DNS at Cloudflare
- hosting at SiteGround
- email at Google Workspace
Different systems. Different credentials. Different failure points.
Step 1: Build the new hosting account before touching DNS
The safest migration starts with a fully prepared destination.
Upload the site first. Create databases. Install SSL. Configure PHP versions. Test file permissions. Make sure backups work on the new server before visitors arrive there.
Most shared hosting providers now offer temporary preview URLs or local hosts-file testing. Use them.
Because here’s the operational reality: once nameservers change, the internet starts asking the new server for answers immediately — even if the setup is incomplete.
A cheap hosting plan is usually fine for a small brochure site. It becomes less fine when you need staging, rollback snapshots, or migration support that answers before business hours disappear.
A practical beginner default:
- Shared hosting with managed backups
- Free SSL
- Staging environment
- Live chat support
A better alternative for growing sites:
- Managed cloud hosting with isolated resources
- Separate DNS provider
- External email hosting
More moving parts. Far fewer recovery problems later.
Step 2: Copy the website and test it on the temporary URL
This step exists to catch failures before public DNS changes expose them.
Test:
- homepage loading
- forms
- login areas
- images
- redirects
- plugins
- caching
- mobile rendering
And test HTTPS specifically.
One common migration failure is mixed-content warnings after SSL installation. The page loads, but images or scripts still reference the old HTTP URLs.
That problem often survives the migration unnoticed until Chrome starts blocking assets.
The first thing experienced site managers check after a migration is not speed. It’s error logs.
Step 3: Recreate email records before you change nameservers
This is where many “successful” migrations quietly fail.
If email uses the same domain as the website, your MX records must exist at the new DNS provider before the nameserver switch happens.
Recreate:
- MX records
- SPF records
- DKIM records
- DMARC records
- mail subdomains
- SMTP verification records
SPF tells receiving servers which systems can send mail for your domain.
DKIM adds a cryptographic signature proving the message was authorized.
DMARC tells receiving mail providers what to do when SPF or DKIM checks fail.
Without them, your site may stay online while invoices, password resets, and support replies start landing in spam folders.
That delay between “site works” and “business email is broken” is what makes nameserver mistakes expensive.
Step 4: Lower the TTL before the cutover window
Lower TTL at least 12–24 hours before the migration if possible.
Example:
- Current TTL: 14,400 seconds
- Temporary migration TTL: 300 seconds
This tells DNS resolvers to refresh records faster during the transition.
It does not make propagation instant. Nothing does.
Some ISPs ignore low TTL values entirely and cache aggressively anyway. That’s why DNS changes still appear inconsistent during the first few hours after a migration.
This is also why late-night panic changes usually make things worse.
Step 5: Change nameservers at the domain registrar
Now change the nameservers.
This happens at the domain registrar — not necessarily the hosting company.
Typical format:
- ns1.examplehost.com
- ns2.examplehost.com
Most registrars apply the change within minutes. Global propagation commonly takes:
- 15–60 minutes for early visibility
- 4–12 hours for most regions
- up to 48 hours globally
(Policies change without notice)
Do not cancel the old hosting account immediately after the switch.
Keep the previous hosting active for at least 72 hours. Longer for business-critical sites.
Because some visitors will still resolve the old DNS cache while others already reach the new server. Turning the old host off too early creates inconsistent downtime.
Step 6: Verify DNS propagation and site behavior
After propagation begins, check:
- website loading
- HTTPS status
- email sending
- email receiving
- DNS propagation tools
- redirects
- CDN behavior
- subdomains
Use multiple networks if possible:
- mobile data
- office internet
- home connection
- VPN exit locations
DNS propagation problems are often regional.
A site can look fully operational from your laptop while half your customers still reach the old server.
And check email authentication again after propagation completes. Especially SPF alignment.
That verification step prevents the “everything works except invoices” problem.
The beginner mistake that breaks email during nameserver changes
The most common beginner assumption is this:
“My hosting company manages email automatically.”
Sometimes they do. Often they don’t.
Changing nameservers replaces the entire DNS zone unless records are recreated first. That means business email can disappear even though the website migration looked successful.
The failure usually appears 2–12 hours later:
- contact forms stop arriving
- outgoing mail fails SPF checks
- Gmail flags messages as suspicious
- Outlook sends messages to junk
The site owner blames the mail provider. The real problem was missing DNS records during the cutover.
When changing one DNS record at a time is safer than replacing nameservers
Sometimes you should not point nameservers at all.
Changing only the A record — the DNS record pointing the domain to a web server IP — reduces risk when:
- email already works correctly
- Cloudflare handles DNS
- third-party services depend on existing DNS
- multiple subdomains exist
- mail routing is complex
This method takes longer operationally. It is usually safer.
Especially for business sites where email continuity matters more than migration simplicity.
Blunt verdict: beginners are often told to replace nameservers because it is easier for the hosting company, not because it is safer for the customer.
What it costs: registrars, DNS hosting, and migration tools (2025–2026 rates — verify before purchase)
| Service | Typical Cost | What You Actually Get | Limitation |
|---|---|---|---|
| Shared hosting migration | Free–$30 one-time | Basic website transfer | Email often excluded |
| Managed hosting migration | Included on mid-tier plans | DNS and support help | Higher monthly cost |
| Cloudflare DNS | Free tier available | Fast DNS propagation | Setup complexity rises |
| Business email hosting | $6–$18/user/month | Stable inbox placement | Separate administration |
| Domain registration | $10–$25/year | Domain ownership | Renewal pricing jumps |
Cheap hosting becomes expensive when recovery time matters.
And registrar renewal pricing is where many beginner “deals” collapse after year one.
What to do when the site still loads from the old host
Wait before making more DNS changes.
That inconsistency is usually propagation, not failure.
Check:
- current nameservers
- DNS cache
- local browser cache
- propagation status
- CDN cache
Do not repeatedly switch nameservers back and forth trying to “force” updates. That extends instability.
If the new site still does not appear after 24 hours:
- Verify nameservers at the registrar
- Confirm the new DNS zone exists
- Check A records
- Check SSL installation
- Verify the hosting account is active
And keep the old host online until traffic stabilizes.
That single decision prevents many migration disasters.
Frequently Asked Questions About Pointing Nameservers
How long does it take to point nameservers to a new host?
Most nameserver changes begin appearing within 15–60 minutes, but full propagation can take 24–48 hours globally. TTL values, ISP caching, and registrar behavior all affect timing. Lowering TTL before migration helps reduce inconsistency during the cutover window.
Will changing nameservers delete my website?
No. Nameserver changes do not delete files. They only change where DNS points visitors. The real risk is pointing traffic to a hosting account that is incomplete, misconfigured, or missing DNS records.
Is it safer to change A records instead of nameservers?
Usually yes for business sites with active email systems. Updating individual DNS records keeps existing mail routing and DNS infrastructure intact while moving only website traffic to the new server.
Why did email stop working after the migration?
The new DNS provider probably lacked MX, SPF, DKIM, or DMARC records before the nameserver switch. Website migrations often appear successful while mail authentication silently fails afterward.
Should I keep the old hosting account active after changing nameservers?
Yes. Keep it active for at least 72 hours after the DNS cutover. Some visitors and ISPs continue resolving cached DNS entries long after the first propagation wave completes.
Continue Exploring
- Web Hosting, Domains, Email Infrastructure explains how hosting, DNS, domains, and business email fit together before you start changing infrastructure.
- business email deliverability covers SPF, DKIM, DMARC, inbox placement, and the email failures most migrations create accidentally.